|
|
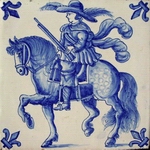
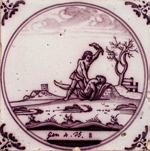
Horseman with rifle, so called large rider; blue; corner motif lily; Harlingen or Utrecht; since 1880 (approx. 1900), adapted from the horsemen of the period from 1700 to 1750; 13,1 x 13,1 x 0,8 cm |
Production process
Before a tile is made and shines
in its magnificence and could be used especially for fire-places or as wall
decoration, an extensive production process with many work cycles was required.
|
|
Horseman with rifle, so called large rider; blue; corner motif lily; Harlingen or Utrecht; since 1880 (approx. 1900), adapted from the horsemen of the period from 1700 to 1750; 13,1 x 13,1 x 0,8 cm |
Cutting and
firing
Glazing and painting
Colours
Size
First of all the wet clay was rolled
out into tablets with a round wooden stick. By using a frame the wet clay was
pressed out of the tablet and dried
until it was as hard as leather.
Then the material was cut into 13,5 x 13,5 cm wide squares.
To cut the tiles a wooden template was used, placed on the surface of the blank clay. Until the middle of the 17th century the template had small nails on three or four corners, to hold it still during the cutting process.
|
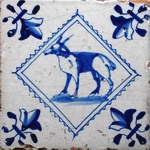
Goat in jagged
diamond; blue; |
|
Later only two nails opposite each other were hammered in the template.
|
|
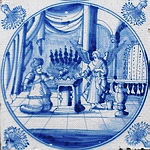
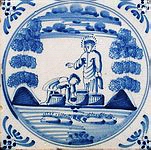
Biblical scene, the Annunciation of the birth of John the Baptist to Zachary (Luke I.11.); in large double circle; blue; corner motif: carnation; Amsterdam approx. 1750, 13,0 x 13,0 x 0,8 cm; with two nail holes in opposite corners, one above right and one below left, typical for tiles of the 18th c. |
This method of cutting by hand was
common until 1860.
|
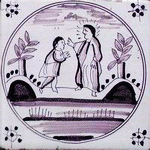
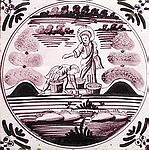
Biblical scene, Jesus heals a possessed man (Matthew IX.32 and XII.22.-24.; Luke II.14.,15.); in large double circle; purple; corner motif: spider; Harlingen 1880 - 1900, 13,0 x 13,0 x 0,8 cm; typically without nail holes |
|
The nails left small holes in the tiles, which are also called „baking points“. They are still visible in the surface of the glaze if you look closely at the tiles.
Consequently those nail holes can certain
help to indicate the age of a tile.
The cut plate of clay was then slowly
heated up to 1000°C in the kiln and fired for about 40
hours.
The result was a naturally coloured, porous earthenware (reddish-brown, yellowish, or even grey, depending on the age).
The cooled down blank clay was either dipped from
one side into a
glaze consisting of a mixture of melted tin-ashes, quartz, sand, soda and water, or
this mixture was poured over it.
After drying the tile was
painted.
|
Patrician couple, she with a feather-fan hanging down her arm, he holding a large hat with two feathers in his hand, of those clothes are painted very artistic; blue with darker blue lines; corner motif: ox-head; approx. 1675; 13,0 x 13,0 x 1,0 cm; rare |
|
|
The fine powder which came through the pricked holes showed the outline of the motif. The painter went over the visible contour by using a special brush. Afterwards he painted it as he saw fit.
|
|
|
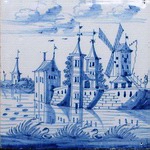
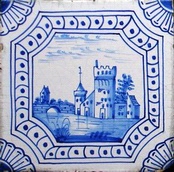
Landscape tile: windmill on town wall with dyke guard, in the background several buildings and in the foreground two swans in the reeds; painted accurate in every detail; blue; overall painting; Rotterdam, 1625 - 1650; 12,6 x 12,6 x 0,8 cm |
Because pricked stencils were used, many tiles have similar pictures.
|
|
|
|
|
Beyond that the use of this technique is also clearly shown in so-called mirror-image tiles. In this case, the charcoal powder was tapped over a sponse that was made from the same picture, but pricked through the other way round.
 |
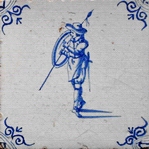
For example, see these two tiles with warriors: the soldiers are painted in similar outline (wearing a hat, holding a shield and lance, with a rapier at the hip), one looks to the right and one to the left (like a reflected image). Only the final painting is different; both blue with ox-head corner motifs; probably Rotterdam; 1630 - 1660; 13,0 x 13,0 x 1,1 cm |
|
When the painting was finished, the tile was baked once again at a temperature of 900°C. The heat caused special colours to amalgamate with the melted tin overglaze.
The high temperature, however, strongly limited the choice of
("hot") colours.
|
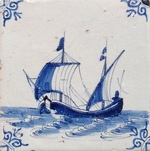
Ship in typical blue; |
|
Secondly, there is the typical purple, also called "manganese" (because manganese superoxide was added to the glaze). This colour came into fashion in the 18th century. Blue and purple are indeed the most used colours.
|
|
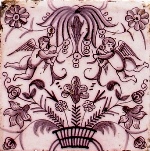
Ornamental tile: two
putti (angels) in floral ornament; purple; probably Harlingen or
Leiden, |
The colours yellow, black, red, orange, light blue, green and brown you also find on tiles, but seldom used for in one colour tiles (monochrome tiles).
|
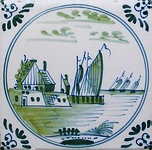
Landscape
tile painted in green
(rare);
harbour scene in a large double circle; corner motif: ox-head; |
|
Tiles
were rather painted
in more colours (polychrome tiles), mostly in the late 16th
and the early 17th century.
|
|
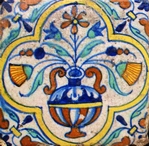
Flower vase in a
quatrefoil; |
Because the production process was nearly the same through the centuries, Dutch tiles of all periods are of a standard size of approximately 13 x 13 cm (5''). Looking closer, the size decreased between 1570 and 1630 from 13,7 x 13,7 cm to 13,2 x 13,2 cm. This continued to a size of 12,4 x 12,4 cm, which mostly appears for tiles of the 2nd half of the 17th century. Tiles of the 18th, 19th and also of the 20th century are predominantly standard sized (13 x 13 cm = 5'').
The dimentions of the tiles partly deviate from 1570 to the 1st half of the 17th century considerably. They are approximately 8,5 x 8,5 cm, 10 x 10 cm (4''), 11,7 x 11,7 cm and 14,7 x 14,7 cm up to 16,5 x 16,5 cm. During the 18th century tiles bigger than standard sized are, however, rare. Afterwards different non-standard sized tiles appear again, predominately after 1830. These tiles are often 15 x 15 cm (6'').
|
|
|
|
||||||
|
|
|
|
|
|
||||
Besides that, you also find tiles approx. 19 x 19 cm. These tiles were certainly used as floor tiles, rather than wall tiles (In addition, look at the size of border tiles, by following the link "Motifs").